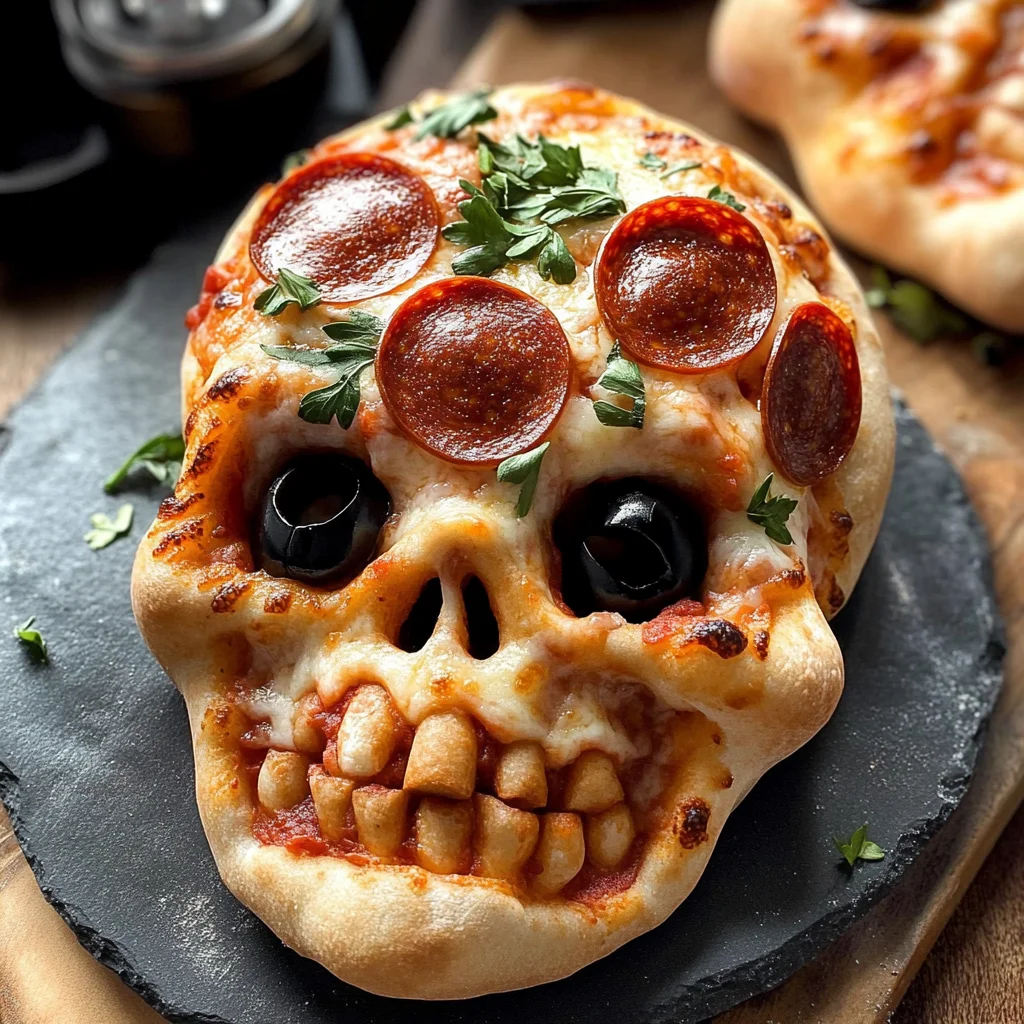
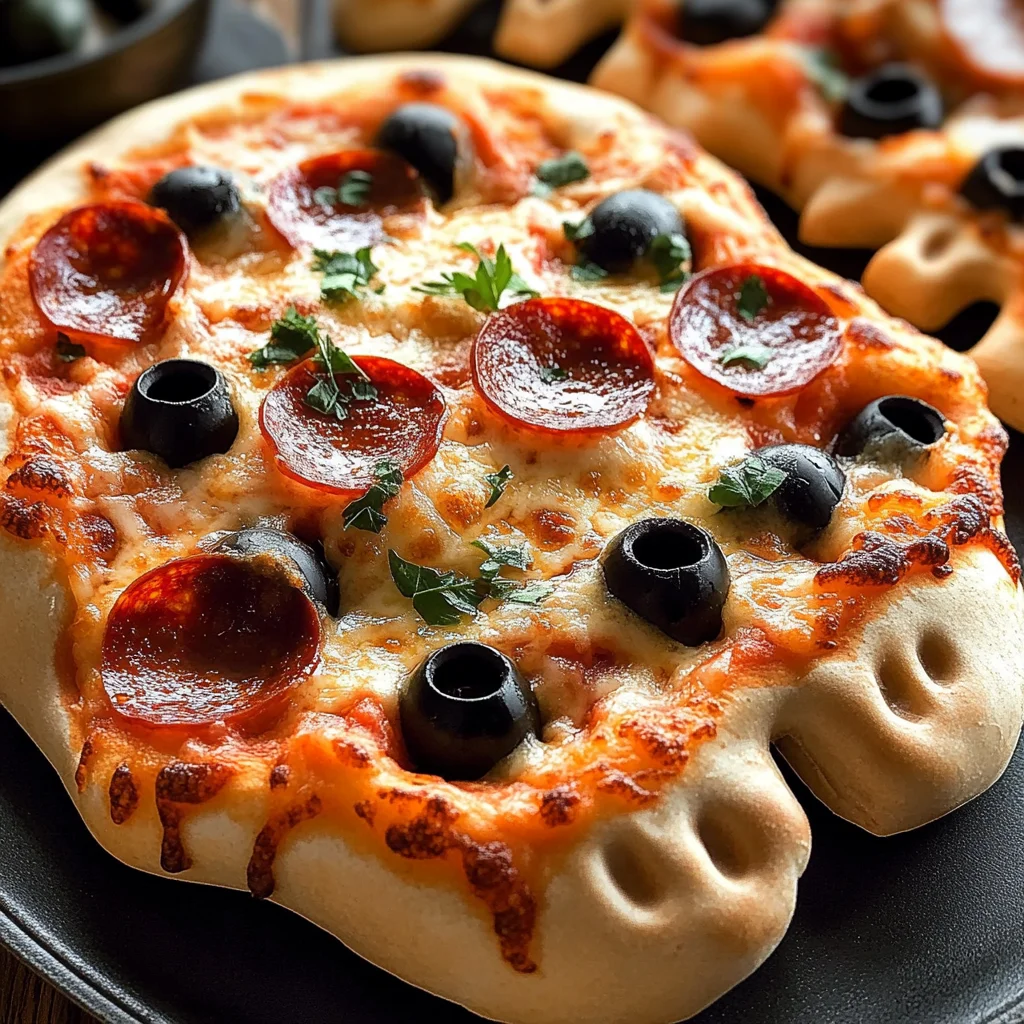
Cheesy Halloween Pizza Skulls
These Cheesy Halloween Pizza Skulls are a spooky yet delightful addition to your Halloween festivities! Perfect for parties or a fun family dinner, these savory treats combine classic pizza flavors in a creative, skull-shaped form. Easy to customize with your favorite toppings, they are sure to be a hit with kids and adults alike during the holiday season.
Why You’ll Love This Recipe
- Fun Presentation: The skull shape adds a playful touch, making them great for Halloween parties.
- Customizable Toppings: You can mix and match ingredients based on personal preferences or dietary needs.
- Easy to Make: With pre-made pizza dough, preparation is quick and hassle-free.
- Perfect for Sharing: Each skull is a single serving, making it easy to share at gatherings.
- Delicious Flavor: A combination of gooey cheese and savory toppings ensures every bite is tasty.
Tools and Preparation
Having the right tools will make your cooking experience smoother and more enjoyable. Here are some essential items you’ll need to prepare this recipe successfully.
Essential Tools and Equipment
- Mini skull baking tin
- Rolling pin
- Cooking spray
- Mixing bowl
- Knife or pizza cutter
Importance of Each Tool
- Mini skull baking tin: This unique pan gives your pizzas their spooky shape while ensuring even cooking.
- Rolling pin: It helps in evenly flattening the dough for consistent thickness.
- Mixing bowl: Ideal for combining ingredients before filling the pizza skulls.
Ingredients
Here’s what you’ll need to create these delicious Cheesy Halloween Pizza Skulls:
For the Dough and Sauce
- 13 to 16 ounces of pre-made pizza dough
- 3/4 to 1 cup pizza sauce
For the Cheesy Filling
- 2 cups shredded mozzarella
- Parmesan cheese (about 1/4 cup)
For Toppings
- Cooked sausage (about 8 ounces for 6 pizza skulls)
- Mini turkey pepperoni (about 6 ounces for 6 pizza skulls)
- Black olives (sliced)
- Sliced chicken ham (chopped)
- Crumble crispy turkey bacon
- Mini Italian meatballs
- Cooked corn kernels
- Baby spinach
- Fresh basil
For Serving
- Marinara sauce for dipping
- Chopped parsley or basil
How to Make Cheesy Halloween Pizza Skulls
Step 1: Prepare the Baking Tin
Spray the mini skull baking tin with cooking spray to prevent sticking.
Step 2: Roll Out the Dough
Dust your counter lightly with flour. Roll, pat, or stretch the dough until it is about 1/4 thick. Cut it into 6 rectangles. Remember, they don’t have to be perfect!
Step 3: Fill the Skull Cavities
Take one piece of dough at a time and place it into a skull cavity. Fill with sauce, mozzarella, Parmesan cheese, and your chosen toppings. Add a bit more pizza sauce on top before sealing (no more than a tablespoon).
Step 4: Seal the Pockets
Fold the dough over the fillings, pinching it together to create a seal like a small pizza pocket. Repeat until all pieces are filled and sealed.
Step 5: Chill Before Baking
Refrigerate the tray with filled skulls while you preheat your oven.
Step 6: Preheat Your Oven
Set your oven temperature to 400 degrees Fahrenheit.
Step 7: Bake Your Pizza Skulls
Remove from the fridge and bake for 16 to 20 minutes or until they are golden brown. Adjust time as necessary depending on your dough brand.
Step 8: Cool and Serve
After baking, let them cool for about 5 minutes. Carefully unmold and serve warm with marinara sauce and optional chopped parsley or basil for garnish.
How to Serve Cheesy Halloween Pizza Skulls
Cheesy Halloween Pizza Skulls are not just delicious; they are also a fun and festive treat. Here are some creative serving suggestions to make your Halloween gatherings even more enjoyable.
Create a Spooky Platter
- Item – Arrange several pizza skulls on a large platter surrounded by creepy decorations like plastic spiders or fake cobwebs for an eye-catching display.
Pair with Dipping Sauces
- Item – Serve alongside marinara sauce, ranch dressing, or garlic aioli for added flavor and fun dipping experiences.
Add Fun Garnishes
- Item – Top the pizza skulls with freshly chopped parsley or basil to give them a pop of color and freshness.
Set Up a Build-Your-Own Station
- Item – Let guests customize their pizza skulls with various toppings laid out on a table. This interactive element is great for parties!
How to Perfect Cheesy Halloween Pizza Skulls
Making the perfect Cheesy Halloween Pizza Skulls requires attention to detail. Follow these tips for the best results.
- Use fresh ingredients – Opt for high-quality cheese and fresh vegetables to enhance the flavor profile of your pizza skulls.
- Don’t overfill – Be careful not to overload the dough with fillings, as this can cause leaks during baking.
- Seal tightly – Pinch the dough securely to ensure that all fillings stay inside while baking, resulting in a perfect pocket.
- Watch the baking time – Keep an eye on your oven; some pre-made dough may bake faster than others, so adjust as needed.
Best Side Dishes for Cheesy Halloween Pizza Skulls
To complement your Cheesy Halloween Pizza Skulls, consider these tasty side dishes that will round out your spooky meal.
- Crispy Salad – A fresh green salad with crunchy veggies provides a nice contrast to the cheesy pizza skulls.
- Garlic Breadsticks – Soft breadsticks brushed with garlic butter make for a warm and inviting side.
- Roasted Vegetables – Season seasonal vegetables like bell peppers and zucchini for a healthy addition to your spread.
- Stuffed Mini Peppers – These colorful bites stuffed with cream cheese or hummus add flavor and festivity.
- Vegetable Platter – A mix of raw veggies served with a tangy dip is both healthy and visually appealing.
- Potato Wedges – Crispy potato wedges seasoned with herbs can be an excellent finger food option that kids love.
Common Mistakes to Avoid
When making Cheesy Halloween Pizza Skulls, it’s easy to run into some common pitfalls. Here are a few mistakes to watch out for:
- Bold dough preparation: Not rolling the dough evenly can lead to uneven cooking. Make sure to roll it out to about 1/4 thick for consistent results.
- Bold overfilling: Adding too many toppings may cause the skulls to burst while baking. Stick to a small amount of your favorite fillings for a perfect seal.
- Bold neglecting the seal: If you don’t pinch the edges well, the filling can leak out during baking. Ensure they are tightly sealed before putting them in the oven.
- Bold ignoring bake times: Different brands of pre-made dough have varied baking times. Keep an eye on them towards the end of the specified time for optimal browning.
- Bold skipping cooling time: Removing them from the tin immediately can cause breakage. Allow them to cool for a few minutes before unmolding.
Storage & Reheating Instructions
Refrigerator Storage
- Store in an airtight container for up to 3 days.
- Place parchment paper between layers if stacking to prevent sticking.
Freezing Cheesy Halloween Pizza Skulls
- Freeze in a single layer on a baking sheet before transferring to an airtight container.
- They can be frozen for up to 2 months.
Reheating Cheesy Halloween Pizza Skulls
- Oven: Preheat oven to 350°F and heat for about 10-12 minutes until warmed through.
- Microwave: Heat on medium power for about 30 seconds, checking until warm.
- Stovetop: Use a skillet over low heat, covering with a lid until heated through (about 5-7 minutes).
Frequently Asked Questions
Here are some common questions about Cheesy Halloween Pizza Skulls:
Can I customize the toppings?
Yes! You can use any combination of your favorite ingredients like vegetables or different types of cheese.
How do I make these vegetarian?
Simply replace any meat toppings with extra veggies, cheese, or beans for added protein.
Can I use homemade pizza dough?
Absolutely! Homemade pizza dough works perfectly and adds a personal touch.
What is the best dipping sauce?
Marinara sauce is popular, but ranch dressing or garlic sauce also complement these pizza skulls well.
How can I store leftovers?
Store leftovers in an airtight container in the refrigerator or freeze them for later enjoyment.
Final Thoughts
Cheesy Halloween Pizza Skulls are not only fun but also versatile. You can easily customize them with your favorite ingredients, making them perfect for gatherings or family dinners. Give this spooky treat a try; your friends and family will love these cheesy delights!
Cheesy Halloween Pizza Skulls

Cheesy Halloween Pizza Skulls are a delightful way to bring fun and flavor to your Halloween celebrations. These spooky-shaped savory treats combine classic pizza ingredients in an engaging skull design, making them perfect for parties or family gatherings. With the ability to customize toppings, you can cater to everyone’s tastes, ensuring that both kids and adults will enjoy these cheesy bites. They’re easy to prepare—simply fill pre-made dough with your favorite ingredients and bake until golden brown. Serve them warm with marinara sauce for dipping, and watch as they disappear from the platter at your Halloween festivities.
- Prep Time: 20 minutes
- Cook Time: 20 minutes
- Total Time: 40 minutes
- Yield: Makes approximately 6 servings 1x
- Category: Main
- Method: Baking
- Cuisine: American
Ingredients
- 13 to 16 ounces pre-made pizza dough
- 3/4 to 1 cup pizza sauce
- 2 cups shredded mozzarella cheese
- 1/4 cup Parmesan cheese
- Cooked turkey sausage or mini turkey pepperoni
- Sliced black olives
- Chopped cooked chicken
- Crumble crispy turkey bacon
- Fresh spinach or basil (optional)
Instructions
- Preheat your oven to 400°F. Spray a mini skull baking tin with cooking spray.
- Roll out the pizza dough on a floured surface to about 1/4" thickness and cut into rectangles.
- Place each rectangle in a skull cavity, filling with sauce, mozzarella, Parmesan, and desired toppings.
- Fold the dough over and pinch to seal each skull tightly.
- Chill filled skulls in the fridge while the oven heats up.
- Bake for 16 to 20 minutes until golden brown. Let cool briefly before unmolding.
Nutrition
- Serving Size: 1 pizza skull (92g)
- Calories: 220
- Sugar: 2g
- Sodium: 480mg
- Fat: 10g
- Saturated Fat: 5g
- Unsaturated Fat: 3g
- Trans Fat: 0g
- Carbohydrates: 24g
- Fiber: 2g
- Protein: 10g
- Cholesterol: 25mg